Thursday, 16 October 2008
Wednesday, 15 October 2008
Halloween Hair...The base for MANY styles
Start out with dirty hair. Dirty hair holds curl better. At least in my house it does. So when your darling daughter gets her bath the night before, lay off the hair washing. I used a bunch of curl cream and ran it through her hair.

Then I curled ringlets with my flat-iron. You could use a curling iron, but I am more proficent with my flat iron. I curled her entire head of hair in less than five minutes. You can't do that with a curling iron, especially on thicker hair.
To curl her hair with the flat iron, I start at the base of the hair and wrap the hair around the flat iron and slowly pull it down. While I am pulling down, I keep the iron turned.

Less than five minutes later...

Excuse her tired eyes. She had some tummy troubles last night and she parked her pillow and blankets in the bathroom and slept on the bathroom floor. I don't think you sleep very well on the bathroom floor.

However, today we are not any of those characters. So I grab a section of hair at the crown of her head and back comb.

A lot. The poofier you want her hair, the more you back comb.

Now, let the hair fall and smooth over the top of where you just back combed. You may think you have lost some of the curl, but let me assure you, you have not. Those ends look a little wonky.

This wasn't my last step. I also sprayed her hair with hairspray and scrunched the ends up.


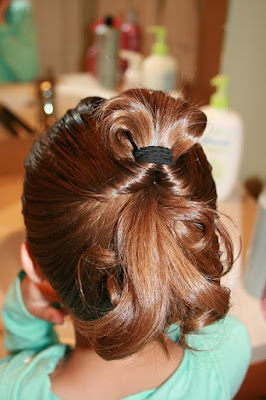
 Here is your base. Now you can take and do what you want with it. For school we put a snap barrette in it and then a flower over that.


For a fairy, I would twist it up into a claw and then let it fly all over the place or pull it into two loose ponytails at the crown and then back comb it some more or even re-curl pieces to give it more definition, like below.

However, what we were going for as far as princesses and characters was Ariel and Sleeping Beauty. I will show you THAT tomorrow. I am cranking these out as fast as I can before Halloween and I will be taking a four-day blogging break starting Friday. I really hope these little tutorials are helping so that moms don't have to go out and buy a bunch of nasty wigs that will never EVER be as cute as their daughters real hair!
Halloween Hair...Cinderella
Okay, after studying all of the princess hair, I have come to the conclusion that Tinkerbell and Cinderella are the most similar of any of the princesses. Although, technically Tinkerbell isn't a princess. But you get what I am saying. Tinkerbell's hair is a little more skewompus. Don't you love that I make up my own words on this blog?
For the slicker Cinderella do, first I start with a very high ponytail. I started with sopping wet hair (just out of the tub) and then I coated it with pomade on the bottom and sides. I was doing this one higher and I did NOT want pieces falling like they usually do on her hair. I used an elastic very similar to her hair color because you will see the elastic on this one.

Then I took and divided her ponytail into three sections. I took the first one and coated it with pomade and looped it over and secured it with two bobby pins criss-crossed. Just push the ends out of the way...we will deal with those later.

Then I did it again on the other side.

Then I took the third piece and did it one more time.

Now the ends. I continued the loop with them by taking my flat iron and curling them in the same direction as the loops. Think one big curly q. Then I tucked the ends into the bobby pins already in place. She had enough in there to set off the metal detectors at the airport, I didn't want to use anymore.

I sprayed the entire contraption with massive amounts of hairspray and then I set it with my blow dryer. Like I said, I didn't want to take the chance that this one would fall out.
Halloween Hair...Tinkerbell
Put the comb between the elastic and the scalp and pull out.
Then flip the ponytail up through the part you made...see the post below.

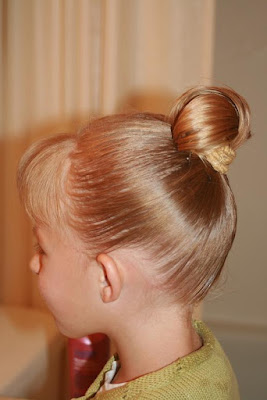
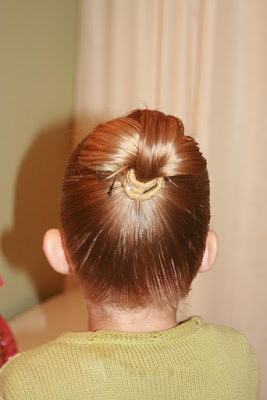
Then I backcombed her hair. Some call it ratting, That word makes me think of rats. For some reason I don't like associtating rats and my kids. Funny the things that you associate. My girls actually call this "fluffing". Spray the hair after you backcomb, fluff, rat, whatever.
Then smooth the top over the ponytail. Spray it again.
Now I take the ends and I tuck them up and secure them with two bobby pins that are crossed. Tess has fairly thin hair so I only needed two bobby pins. Depending on how thick your daughters hair is, you may need more, and you may need to tuck more than once.
Tinkerbell doesn't use a headband...but some glitter would add just the right touch.
Tuesday, 14 October 2008
Halloween Hair...Belle
Start with the hair in a ponytail high on the crown. I curled the ends because this was for school and I didn't have the full time to do what I would have done had she been getting ready for a night of Trick-or-Treating.
Take your rat-tailed comb and slide it between the elastic and the scalp. Using the comb, pull the ponytail out slightly.
Here we are doing and upside down knot. Push the ponytail up through the part you just made with your comb...
...but only partway through.
Then I tied a ribbon around the elastic. Had she really been Belle, I would have taken a yellow ribbon and wrapped it around the elastic and tucked the ends. 
There you go. My human rendition of Belle's ball hairdo.


