Monday, 28 April 2008

A big old thanks...and a giveaway *****It's Over*****

I have noticed a slew of new visitors to my blog. I want to tell everyone who has mentioned my attempt at beautifying the world one hair style at a time to their friends and family a big ol' THANKS!

To show you how much I appreciate your loyalty and cyber-friendship, I am doing my first give-away.

Here is a preview. In addition to these bows, I will also have two other sets and some flowers as well. I will post pictures as I complete them. Don't look too close, I'm not a professional, I am just having fun making them.


The catch, you need to leave a comment on this blog post. I will randomly pull your comment number and this contest will end on Friday, May 2 at 3:30pm Mountain Standard Time.

Sunday, 20 April 2008

Short Hair Part Puffy-Braid


Section the top of the hair into a square.
Make your first part going across the head.
Pull into a ponytail.
Secure with an elastic.
Part the next section going across the head.
Comb down smooth.
Pull the first ponytail into this and make a second ponytail.
Secure with an elastic.
Pull the last part of the square smooth and add the hair that is already in the ponytails to this section.
Secure with an elastic.
***I have included two pictures of this. One with a bow and one without. It is harder to see the elastics with the bow. A ribbon would allow you to see more detail.

Looped Upside-Down French Braid


Today she wanted her hair to look like Kierstie from "American Girls". So I tried. However, that hairstyle doesn't work with upside down French Braids. Only the normal style. Whoops! So here is our creation from my mistake.
Wet the hair, part down the middle.
Pull one side of the hair into a temporary ponytail.
Upside down French braid the opposite side.
Secure the bottom with an elastic.
Take the bottom and fold it up towards you to where the hair meets the neck.
Secure the "loop" with another elastic.
Tie your ribbon on the elastic.
Piece out the ends.
Repeat on the other side.

Saturday, 19 April 2008

Scarf and Flippy Ponytails

AYSO stands for 'All Your Saturdays Occupied".

Which is exactly how we spend every Saturday morning.

And spring is in full, windy force here.

Hence the scarfs.

Plus, I think they are cute.


I just pulled her hair into two flippy ponytails low on her head.
I sprayed well and added the scarf.
She looked adorable running...or so I hear. I stayed home with a baby who would not have done well in the wind.
But at least we don't live in tornado row.

Friday, 18 April 2008

Spring Scarf


Pull hair into a lose, temporary ponytail.
Take a triangle of fabric, or a pre-made hair scarf.
Wrap it around the base of the hair and tie it where the hair meets her neck.
Pull the ponytail out.
Either curl the hair or smooth it out straight.
If you choose to leave parts of the hair down, do that before you put the scarf on.
Spray and be done!

Wednesday, 16 April 2008

Short Hair Ponies on Top

Since we cut Spunky's hair short, we get to come up with lots of fun new hairstyles. This is one of many that I have in my arsenal. Get ready. ;)

Oh, and she looks thrilled in this picture.


Simply part her hair on the part.
Pull the hair on each side up leaving about 1.5-2 inches of hair above the ear.
Attach bows.
Curl the ends.

Friday, 11 April 2008

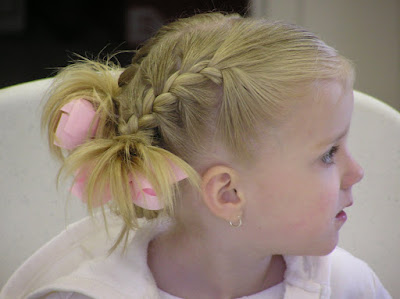
Two French Braids with Spikey Ends

You know, some people are just blessed from the time that they are born with beautiful thick hair. My niece is one of them, and my friend Laurie has three of them. I remember when Little Londynn was born. She is three weeks younger than my Spunky. She was born with gobs of gold hair that never fell out (lucky Laurie)! While my Spunky was resembling Mr. Clean and making do with brain squeezers, Laurie was able to put cute clippies and bows and piggies in her daughter's hair.

Not much has changed. Londynn has super thick hair that makes me drool. Here is one of the super cute styles that Laurie does to her hair.

Thanks Laurie for your submission! Keep them coming!


Part the hair first. Laurie parted it on the side and then once she got to the crown she took the part over to the middle.

French braid down the first side. When you get to the part of the braid where you no longer have any hair to braid, this is where you end the braid.

Use your elastic to pull the braid through. When you get to the last loop, only pull the hair 1/2 way through.

Do the same to the other side.

Then put a ribbon or bow on the ponytail For super thick hair like Londynn's, a clip bow would probably stay in if you found the right place for it. For my dd's thinner hair, I would tie a ribbon around the elastic.

Then take your flat-iron or your curling iron and spike out the ends. Spray the hair.

Tuesday, 8 April 2008

Hair Headbands

Lately in little girl world, we have been experimenting with what has been dubbed as "hair headbands".

I don't know about the rest of you, but put a headband in my daughters hair and it is taken out within minutes, if not seconds. THIS is a superfun, and super cute alternative.

It is really easy. You part their hair and then section it off in the front. I pull the hair that I am not using into a temporary ponytail so that it doesn't get in the way. From here, it is just up to you to decide how to make your headband. My daughters have a lot of wispy baby hairs, so the upside down French braid is our favorite. It stays put the best. My friend, Hilary, leans towards a normal French braid or a French twist, as featured below.

Once you have decided what your preference is, you braid or twist all the way to the ends. I secure each of the ends with an elastic and then band the two under the hair.

Once you band the two parts together, you can either curl the hair, leave it straight, pull the rest up into a ponytail or a flippy ponytail. It is limited to only your imagination.


Wednesday, 2 April 2008

Long Knots

*This hair style was submitted by Melissa. THANKS Melissa!

One of my daughter's friends had her hair like this the other day and so I asked her mom how she did it. It was so easy! I couldn't believe it.

You have to have it wet, at least on the top, and use mousse, gel, or whatever you normally use to help hold the do, then hairspray afterwards

Just divide into sections, then divide each section into two parts.

Literally it's just a knot that is wrapped three times intead of just once.

Pull the 'knot' tight and hairspray it.

Cool, huh?